How to make chocolate Easter eggs?

Easter eggs are always fun to receive, but did you know you could have even more fun by making your own?
It's very easy to make your own chocolate Easter eggs at home if you follow this handy guide. Besides being a lot of fun, it's the perfect way to personalize them to make them even more special.
With the range of chocolate Easter eggs available in stores, stacked from floor to ceiling, I think it's fair to say that chocolate is a key ingredient as part of Easter celebrations!
There's a huge choice, from the ever-popular praline eggs , to large chocolate eggs with intricate decorations and staggering prices.
But have you ever wondered how to make your own Easter eggs? Well, it's not that difficult! It takes time and patience, but it's great fun and rewarding to make them yourself.
PHOTO
Your own original chocolate eggs
Of course, by making homemade Easter eggs , you not only save a little money, but you can customize them exactly the way you want.

HIDDEN SURPRISES
You can fill the eggs with hidden surprises . If you like marshmallows, why not fill the egg with marshmallow cubes? A delicious center of homemade caramel pieces or some homemade chocolate truffles would also be a great surprise. Or, fill it with your favorite mini chocolate bars. Nothing too heavy though, you don't want them breaking the chocolate shells .

KEEP IT SIMPLE OR GO CRAZY
As for the exterior of the egg , you can of course leave your chocolate Easter egg plain .
You can opt for a fancy frozen egg , and personalize it with the name of the lucky recipient. Or simply attach a few sugar flowers or other ready-made sugar decorations .
You can also opt for a more contemporary design, which is surprisingly easy to make by dripping contrasting chocolate back and forth over the mold before completely enrobing it in milk chocolate .

You can also do this after crafting the eggs , which will give a different effect.
Whichever you choose, it's so much fun to make your own custom Easter egg while letting your creativity run wild. And if your egg isn't perfect, don't worry because you'll always have the consolation of having all that lovely chocolate to eat! Chocolate heaven!
How to Temper Chocolate?

The key to success is having well-tempered chocolate. Chocolate tempering involves heating and cooling the chocolate, then reheating it until it reaches a workable temperature and then takes on a crisp, shiny finish just the way we like it!
It gives chocolate that characteristic crunch when you bite into it. Untempered chocolate has no "bite", it is dull and can develop a "bloom" (dull white color spot) which spoils the appearance.
Tempered chocolate does not melt at cool room temperature. This is particularly important for making homemade Easter eggs and other molded chocolates , as tempered chocolate shrinks slightly and therefore comes out of the mold easily.
Our chocolate tempering tip has more details and tips for successful chocolate tempering every time, so it's worth reading it before you start.
Once the Easter chocolate is tempered , simply partially fill the plastic egg molds and swirl the chocolate to achieve an even thickness all over the surface.
Where to buy Easter egg moulds?
Easter egg molds are not easy to find in department stores and supermarkets, but you have to shop around because the price can vary enormously for the same product.
You will find a whole collection of chocolate molds on our online store. I personally prefer clear polycarbonate molds to silicone molds because I think they give a better shine to shiny Easter eggs , although you may find the eggs slightly easier to unmold with silicone molds , especially if the temperature is not perfect.
The chocolate will take the surface on which it is taken. Wash the egg molds in hot soapy water and dry them well (water is the sworn enemy of chocolate). Before using, pat the inside of the molds dry with a piece of paper towel or lint-free cloth (cotton cloth is fine) to get a nice shine once the chocolate is unmolded .
What is the best chocolate for making Easter eggs?

The chocolate we use to make Easter eggs is known as couverture chocolate and contains extra cocoa butter and a higher percentage of cocoa. It melts evenly, pours and spreads more easily and gives a more even chocolatey layer than other chocolates.
The couverture must contain at least 31% cocoa butter and the combined percentage of cocoa butter and cocoa in the low fat chocolate must be at least 54%. To find couverture chocolate, you'll need to head to the chocolate aisle in larger supermarkets, but it's likely not labeled as such but as a pastry chocolate bar , so check the percentage of cocoa butter on the package before opening it.
If you intend to cook with chocolate on a regular basis, it is better to buy larger chocolate blocks or bags of chocolate shavings like those sold in our online store , as it is much cheaper in the long run.
Valrhona chocolate beans are all the same size and therefore melt more evenly and faster than chocolate that you cut by hand in a chocolate bar .
You can use regular (dark) chocolate, milk chocolate, or white chocolate to make Easter eggs .
Dark chocolate is the least sweet and contains no milk, so it has the purest chocolate taste. Milk chocolate is sweeter and adding milk gives it a creamier taste and texture. White chocolate , the sweetest, is made from cocoa butter, sugar, milk, and vanilla and has a chewy buttery texture and taste.
If you like plain chocolate and are new to chocolate making, I highly recommend starting with dark chocolate, as it's the easiest to temper . White chocolate is the most difficult, with milk falling in between.
Imagine how many personalized Easter eggs you could make for your friends and family at a fraction of the price and without all the unnecessary wrapping!
Our Chocolate Easter Egg Recipe

Step by step - How to make Easter eggs
FIRST STEP - TEMPERING THE CHOCOLATE
There are different ways to temper chocolate; this method is called the seeding method .Place two-thirds of the chocolate in a bowl and place it over a pan of hot water so that the base of the bowl does not touch the bottom of the pan. Melt the chocolate , stirring gently.
The chocolate must reach a temperature of between 45/48°C for milk chocolate and white chocolate and 53/55°C for dark chocolate. It will be quite runny at this point.
Remove the bowl from the heat, wiping the bottom of the bowl clean. Add the rest of the chocolate "beans". Stir vigorously, breaking up the chocolate with the silicone spatula until all the chocolate is melted.
The chocolate must cool down to 27/28°C for milk chocolate and white chocolate, 28/29°C for dark chocolate.
At this point, the chocolate will be quite thick and viscous, so warm the chocolate gently to bring it up to working temperature. Put the bowl back on the pan of water and heat the chocolate very gently, stirring until 29/30°C for the milk chocolate and the white chocolate, 31/32°C for the dark chocolate. You may need to heat the water first.
If you are not equipped with a kitchen thermometer to control the temperature variations of the chocolate, it is possible to do without a digital thermometer by melting half of the chocolate in a bain-marie and then adding the other half outside of the heat. . The end result will be less shiny but satisfying for the first time.
SECOND STEP - PREPARE THE MOLDS

THIRD STEP - COATING THE INSIDE OF THE CHOCOLATE MOLDS

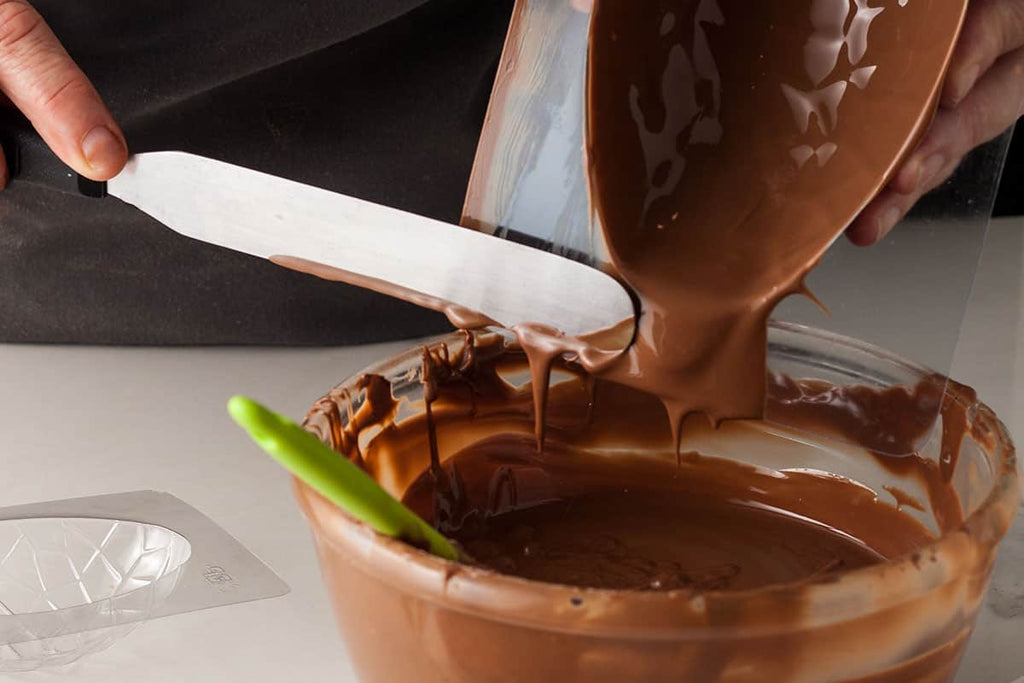
Drop enough chocolate into the mold to fill it about one-third full, then tilt the mold until the chocolate has covered the entire inside of the mold. Then hold the mold over the bowl of chocolate and scoop out the excess.
Then, use a stainless steel spatula to remove the chocolate from the edges of the mold. This will refine the edges of the shells and make it easier to assemble the chocolate of the two halves of the egg later.
Place the coated mold upside down on the work surface of a baking tray for about 5 minutes. Turn it right side up and let the chocolate harden. 
Repeat the process of filling with more chocolate and removing excess chocolate .

FOURTH STEP - REMOVAL OF THE EASTER EGGS: SET THEM SIDE TO HARDEN.
Set the chocolate shells aside and let the chocolate harden for at least an hour, avoid putting them in the fridge.
Once the chocolate has completely hardened, it will have shrunk very slightly. Loosen the edges of the chocolate by gently pulling on the moulds. Then turn the molds over and carefully remove the chocolate shells.

How to glue chocolate eggs?
FIFTH STEP - FINISHING THE EGGS
Heat a baking tray or a heavy-bottomed skillet on the hob.
Gently place the corresponding chocolate eggshells on the hot surface for a second or two to melt the edge of the chocolate shell a little. At this point you can place a few more chocolates or candies inside an egg half before carefully joining the two halves together, holding the egg together as the melted chocolate begins to set and "stick" the two pieces together.

It is advisable to wear disposable gloves to avoid leaving fingerprints on the finished egg.
Leave the eggs without sticking them or make small shells of royal icing along the assembly. Decorate as desired.

Homemade Chocolate Egg Recipe
It is very easy to make your own Easter eggs at home. Besides being a lot of fun, it's the perfect way to personalize them with your favorite sweets.
- Preparation time: 1 hour
- Cooking time: 1 hour
- Ingredients: 600 g of chocolate - Selection of your favorite sweets (optional) - Ingredients to decorate (optional)
- Utensils: Egg molds - Spatula - Maryse - Thermometer
Recipe Instructions
- Make sure the chocolate molds are scrupulously clean and dry and polish the inside with a piece of paper towel or a cloth.
- Place approximately two-thirds - 400g of chocolate in a heatproof bowl. Place the bowl over a saucepan containing boiling water for cooking in a bain-marie. Heat gently, stirring, until the chocolate melts and reaches a temperature between 45/48°C for milk chocolate and white chocolate and 53/55°C for dark chocolate.
- Let the chocolate cool. Remove the bowl from the mold and wipe the bottom of the bowl clean. Add the remaining 200 g of chocolate. Stir the chocolate constantly until the extra chocolate has melted and cooled to 27/28°C for milk chocolate and white chocolate, 28/29°C for dark chocolate.
- Return the bowl of chocolate to the pan. Keep stirring and heat gently to 29/30°C for milk chocolate and white chocolate, 31/32°C for dark chocolate. The chocolate is now tempered . Remove the bowl from the heat, wiping it out again.
- Pour enough chocolate into the mold to fill it about a third, then tilt the mold until the liquid chocolate covers the entire inside of the mold. Then hold the bowl of chocolate and remove the excess. Then, use a stainless steel spatula to remove the chocolate from the edges of the mold. This will make the edges of the shells sharper, making it easier to put the two halves of the egg together later.
- Place the chocolate-covered mold upside down on a baking tray for about 5 minutes. Turn it right side up and let the chocolate harden . Repeat the process of filling with more chocolate and removing excess chocolate .
- Set the chocolate shells aside and let the chocolate harden for at least an hour, avoid putting them in the refrigerator. Once the chocolate has completely set, it will have shrunk slightly. Loosen the edges of the chocolate by gently pulling on the moulds. Then turn them over and gently squeeze the chocolate shells .
- Heat a baking sheet or heavy-bottomed skillet on the hob until hot.
- Carefully place the matching eggshell on the hot surface for a second or two to melt the edge of the chocolate shell a bit. At this point you can place a few more chocolates or candies inside an egg half before carefully joining the two halves together, holding the egg together as the melted chocolate begins to set and "stick" the two pieces together.
- Leave the chocolate eggs without sticking them or place small shells of royal icing along the joint. Decorate as desired.
Chocolatier Tips
- The 600 g of chocolate should be enough to make about 3 Easter eggs of 14 cm. Even if you only make one small egg, temper at least 300g of chocolate. Anything less makes the process very difficult.
- Leftover chocolate can be poured into a piece of parchment paper and left to harden, then wrapped in the paper to be used another day.
- It's good to keep some fresh chocolate on hand, which can be used as a "seed" if you need to remix.
- Avoid adding heavy confectionery inside the shell, as it may break the fragile chocolate shell . Marshmallows, mini eggs, chocolate bunnies , and small chocolate bars for treats are all suitable.
- Reheat the chocolate to the proper temperature if the unused chocolate begins to thicken before you've finished shaping the shells.
- For an original finish, slide or spray contrasting tempered chocolate on the shell using a chocolate gun for example. You can do this before filling the shells with chocolate and let the chocolate harden completely before coating the shells with chocolate . Add the main chocolate little by little; if you add a large amount, you risk overheating the chocolate decoration and causing it to melt. You can also decorate the eggs with the contrasting chocolate after you have assembled them.
- A pretty Easter egg decoration would be to attach sugar flowers to the outer shell of the shell with melted chocolate or royal icing. You can also write the recipient's name on the chocolate shell .
- You can place the eggs in the refrigerator for a few minutes to speed up the setting, but avoid leaving them in the refrigerator for more than 10 minutes. (see note on retention below)
Chocolate Storage
If homemade chocolate is properly tempered, whole eggs should keep for a few months if wrapped and stored in an airtight container in a cool, dry place. Do not store homemade chocolate in the refrigerator: hot air condenses on cold chocolate and deteriorates it.
Fill these beautiful, hollow, edible chocolate eggs with candy, toys, love notes, or anything else you can imagine! A homemade chocolate egg is a wonderful and thoughtful Easter gift.
If you like chocolate recipes and want to make more artisanal creations such as homemade chocolate candies , discover our homemade chocolatier kits by clicking on the image below: